
Definition Jewelry
February 24, 2012
jewelry: n. Ornaments, such as bracelets or rings, made of precious metals set with gems or imitation gems.
Dear American Heritage College dictionary: I beg to differ. I’ve spent the better half of this month making multiple jewelry pieces that don’t feature any sort of jem, but instead feature my favorite definitions. From the book that I hollowed out here in my first craft post, I saved the pages so that I could take my favorite words and feature them in jewelry. I love the look and the style of necklaces and earrings that have resulted from this treatment.

Book page jewelry!
Definition Jewelry
- Materials needed: I found these wonderful bases and glass pieces here. Then, I decided to use definitions, an excerpt from The Book Thief, and a few illustrations as the base. You’ll also need some standard glue and cardstock.
- Time it took: This one is hard to say due to the assembly of parts and the amount of time the glue took to dry. I left my glue overnight, but I’m sure different kinds would work differently.
- Things I learned the hard way: Glue! How in the world do you get a piece of glass and a piece of paper to stick to a necklace base without anything showing? Also, keep in mind that the earrings are small and only allow for one word to be featured on them.
How did I do it?
I bought several jewelry bases here. Then, I cut out circles for each of my pages and glued them on. Simple!
Words I used:
efferent – for my best friend, who recommened the word.
eloquent – also for my best friend, who works better with language than I ever will.
dream – two words for the earrings
enchantment – the first book that my boyfriend gave me, even before we knew we’d end up together. It was a fabulous book by my favorite author, Orson Scott Card, and the word is lovely as well.
love – because I know that someone, somewhere, will want that on a necklace.
The Book Thief – for my sister, because I cut that book up without her consent. Sorry, sis!
Illustrations from a random reader’s digest: I found trees, a compass, and a few flowers that I thought would look fabulous behind glass. I was right!
Book Cover iPad/iPhone Case
February 13, 2012
“The human body is a machine which winds its own springs. “
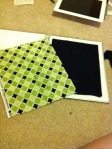
Says Julien Offroy de la Mettrie, writer of L’Homme Machine. Today’s repurposing is how I took a title in a new direction. While thrifting with me, my mother picked up this beautiful silver book and handed it to me. “The Incredible Machine” was its title, and immediately we knew what it would become. The book actually referred to the human body, but I had something a little different in mind. You see, for Christmas, I received an iPad from my wonderful parents, and this book was going to be its newest home.

My iPad and its home.

Lookin' fancy!
Book Cover iPad/iPhone case
- Materials needed: Utility knife, a book, a zipper, fabric, fabric glue, scissors, padding (I used cheap felt squares from the Wal-Mart craft section), and some patience!
- Time it took: 2 hours, not counting the hour of celebration after its completion
- Things I learned the hard way: Let the glue dry. That’s why I included ‘patience’ in the materials list: the zipper won’t be ready in five minutes, or even fifteen, as I discovered.
How did I do it?
I saw this here, and fell in love with it. I didn’t really find any instructions, so this one is all me this time!
I also made an iPhone case:

Not as clean, but it still happened!
The run down: Find a book that will hold your iPad. Cut out all the pages, and don’t worry about how dirty it looks, you’ll just be covering it up with fabric. Cut out felt squares that are 1″ from the edges of your book, and fabric that is .5″ away from the edges. Glue down the felt (I used three sheets on each side), and then glue the fabric on top. NOW! The tricky part was the zipper. I had to google like crazy to figure out how to install a zipper, and eventually I just went for it. I glued right around the edges, so that it covered up where my fabric stopped. I also used standard fabric glue. Give it an hour to dry! Then, I cut out a tube of felt and wrapped fabric around it for the middle of my book and glued that down. Pretty easy!
-

- Book, iPad, fabric.
-

- Cover of the book with the fabric I chose.
-

- They meant iPads, right?
-

- And, as always, the pages had to be removed.
-

- The interior, which was unfortunately covered up.
-
- The felt worked great as padding!
-

- Align the fabric over the felt.
-

- That zipper was a mess, but too important.
-
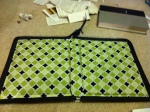
- I must have stared at that finished zipper for an hour.
-

- Lookin’ fancy!
-

- Not as clean, but it still happened!
-

- My iPad and its home.
Senior Thesis Time
January 26, 2012
Ding! A new blog just popped up into the world. How wonderful.
