
Definition Jewelry
February 24, 2012
jewelry: n. Ornaments, such as bracelets or rings, made of precious metals set with gems or imitation gems.
Dear American Heritage College dictionary: I beg to differ. I’ve spent the better half of this month making multiple jewelry pieces that don’t feature any sort of jem, but instead feature my favorite definitions. From the book that I hollowed out here in my first craft post, I saved the pages so that I could take my favorite words and feature them in jewelry. I love the look and the style of necklaces and earrings that have resulted from this treatment.

Book page jewelry!
Definition Jewelry
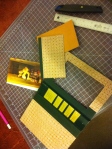
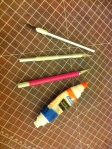
- Materials needed: I found these wonderful bases and glass pieces here. Then, I decided to use definitions, an excerpt from The Book Thief, and a few illustrations as the base. You’ll also need some standard glue and cardstock.
- Time it took: This one is hard to say due to the assembly of parts and the amount of time the glue took to dry. I left my glue overnight, but I’m sure different kinds would work differently.
- Things I learned the hard way: Glue! How in the world do you get a piece of glass and a piece of paper to stick to a necklace base without anything showing? Also, keep in mind that the earrings are small and only allow for one word to be featured on them.
How did I do it?
I bought several jewelry bases here. Then, I cut out circles for each of my pages and glued them on. Simple!
Words I used:
efferent – for my best friend, who recommened the word.
eloquent – also for my best friend, who works better with language than I ever will.
dream – two words for the earrings
enchantment – the first book that my boyfriend gave me, even before we knew we’d end up together. It was a fabulous book by my favorite author, Orson Scott Card, and the word is lovely as well.
love – because I know that someone, somewhere, will want that on a necklace.
The Book Thief – for my sister, because I cut that book up without her consent. Sorry, sis!
Illustrations from a random reader’s digest: I found trees, a compass, and a few flowers that I thought would look fabulous behind glass. I was right!
Rose Petals
February 19, 2012
“A single rose can be my garden… a single friend, my world.”
Oh, man. Leo Buscaglia knows what’s going on with that quote.
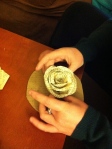
I would marry this rose. While making the wreath from the previous post, I put my roommate to work creating what I thought would be a simple origami rose. After about 30 minutes, I glanced her way and my jaw dropped through my floor and to the bottom floor of our building, and possibly to China. She was not playing around; the rose she was creating was pure perfection. I think by seeing this rose of book pages, my senior thesis project came to fruition. I finally saw that I was creating (or, my roommate in this case) beautiful things from the pages of old books.

Love.
Book Page Roses
- Materials needed: Hot glue, base (I used cardboard), scissors, patience, book pages
- Time it took: appx. 45 mins, depending on your determination and OCD
- Things I learned the hard way: Don’t buy the off-brand burn ointment. You will burn yourself with hot glue trying to glue every single petal onto this rose, it will hurt, and you will want immediate relief. Otherwise, this project went smoothly.
How did I do it?
I cut some pages out for my roommate, showed her this tutorial, and looked back to see a lovely rose beginning to form.
The run down: Cut out rose petals from an aged looking book. They need to be at varying sizes. Ours ranged from .5 inches to about 2 inches in width. Use a cardboard base, and glue the first few petals in a circular and vertical fashion. This one requires just looking at the tutorial and envisioning what a rose is. As you go outward, make the petals less vertical and begin grabbing larger petals. You’ll know when you’re done, because the rose will look full and complete.
-

- Book Page Rose: My Favorite
-
- The halfway mark
-

- Hot glue and petals
-

- Different sized petals. (She needed more than this in the end)
Curled Book Page Wreath
February 17, 2012
“Ideally a book would have no order to it, and the reader would have to discover his own.”
Thanks, Mark Twain, for giving me a quote that could go in any direction. The reader’s digests that I got at a thrift store for 69 cents apiece definitely have no order to them, and I’ve discovered my own order: making a lovely book wreath from curled pages. These wreaths are all over the internet, but the one that I loved the most was found here. I’m in love with the result, and I wish I had more hours in the day to make dozens of them.

My roommate took this with instagram. Makes it 10x more epic.
Curled Book Page Wreath
- Materials needed: X-Acto Knife, hot glue, book pages, some sort of base (I cut out a circle from cardboard), ribbon
- Time it took: 1hr
- Things I learned the hard way: Old looking book pages look best. I rolled a few dictionary pages that were stark white, and I wasn’t loving the look. The pages you see in these photos are aged and give a worn texture look. Also, hot glue is much hotter than you think. You’ve been warned.
How did I do it?
Once again, I followed the instructions right here, because they were fabulous and I adored the result. The rest of her blog is really something special, so I’d definitely check out her other projects! There are several more wreath tutorials out there, so be sure to check out which one is best for you.
The run down: Cut pages, roll them, and glue them to your base. Start with a bottom layer, then layer with a prettier layer. There’s really nothing else to it, except deciding how you want it to look. Do you want all pages to be rolled the same? Do you want them to be wonky, sort of like mine? Don’t forget to add the ribbon at the end to hang it up!
-

- In the meantime, put your friends to work!
-

- My roommate took this with instagram. Makes it 10x more epic.
-
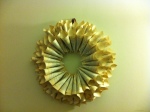
- Hung on the wall!
-

- Keep going in a circular pattern.
-
- At this point, my roommate was laughing at it.
-

- How did I make circles? My trusty Twighlight popcorn bucket.
-
- Base circles
Book Cover iPad/iPhone Case
February 13, 2012
“The human body is a machine which winds its own springs. “
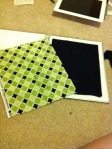
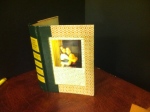
Says Julien Offroy de la Mettrie, writer of L’Homme Machine. Today’s repurposing is how I took a title in a new direction. While thrifting with me, my mother picked up this beautiful silver book and handed it to me. “The Incredible Machine” was its title, and immediately we knew what it would become. The book actually referred to the human body, but I had something a little different in mind. You see, for Christmas, I received an iPad from my wonderful parents, and this book was going to be its newest home.

My iPad and its home.

Lookin' fancy!
Book Cover iPad/iPhone case
- Materials needed: Utility knife, a book, a zipper, fabric, fabric glue, scissors, padding (I used cheap felt squares from the Wal-Mart craft section), and some patience!
- Time it took: 2 hours, not counting the hour of celebration after its completion
- Things I learned the hard way: Let the glue dry. That’s why I included ‘patience’ in the materials list: the zipper won’t be ready in five minutes, or even fifteen, as I discovered.
How did I do it?
I saw this here, and fell in love with it. I didn’t really find any instructions, so this one is all me this time!
I also made an iPhone case:

Not as clean, but it still happened!
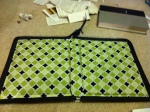
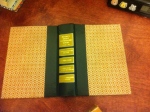
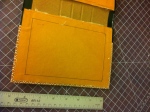
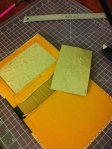
The run down: Find a book that will hold your iPad. Cut out all the pages, and don’t worry about how dirty it looks, you’ll just be covering it up with fabric. Cut out felt squares that are 1″ from the edges of your book, and fabric that is .5″ away from the edges. Glue down the felt (I used three sheets on each side), and then glue the fabric on top. NOW! The tricky part was the zipper. I had to google like crazy to figure out how to install a zipper, and eventually I just went for it. I glued right around the edges, so that it covered up where my fabric stopped. I also used standard fabric glue. Give it an hour to dry! Then, I cut out a tube of felt and wrapped fabric around it for the middle of my book and glued that down. Pretty easy!
-

- Book, iPad, fabric.
-

- Cover of the book with the fabric I chose.
-

- They meant iPads, right?
-

- And, as always, the pages had to be removed.
-

- The interior, which was unfortunately covered up.
-
- The felt worked great as padding!
-

- Align the fabric over the felt.
-

- That zipper was a mess, but too important.
-
- I must have stared at that finished zipper for an hour.
-

- Lookin’ fancy!
-

- Not as clean, but it still happened!
-

- My iPad and its home.
Cover to Cover Picture Frame
February 5, 2012
“Gerry has always believed that we have been put here on Earth to learn, to make the most of our God-given potential. Whatever challenge he chooses next, I have no doubt it will fully occupy our lives.”
So says Sally Spiess, wife of Gerry Spiess, author of Alone Against the Atlantic. I’ve never heard of this book, or even the author, but it’s a story in this week’s book repurposing: a Reader’s Digest. This quote stood out to be because of the parallels it has with my life at the moment. I’m attempting to achieve my full potential, and it is certainly occupying my life. I’m constantly researching and crafting to bring the best possible options to my thesis.
My boss gave me about eight of these Reader’s Digest books, and they have beautiful patterns to their covers that I knew I had to display in some way. Then, I ran across this amazing tutorial by papersnitchblog.com. Aha! A way to display not only the lovely book covers, but also pictures of my friends and family.

My favorite project to date.
Book Cover Picture Frames
- Materials needed: A book, your handy utility knife (once again, good luck with the x-acto knife), a ruler, a pencil, and either magnets or wall hooks.
- Time it took: 15 minutes.
- Things I learned the hard way: Don’t forget to condense the size of your frame! If your photo is 4×6, then cut out a hole that is 3.75×5.75 so that your picture has some room to rest on, or else it’ll fall through.
How did I do it?
Once again, I followed this awesome tutorial. But, if you don’t want to click (but you totally should), I’ll give you the quick run down.
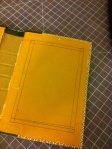
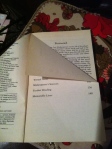
First, cut away the book from its cover and spine. Usually the inside pages are what’s attached the book to spine, so run your utility knife along the edges. Then, get a ruler and mark out where you want your hole to be. I chose 3.75×5.75 so that I could fit a standard size photo and have room to tape on the back. Cut through the cardboard first, then peel it away. Then, proceed to carefully cut through the cover. Mine happened to be extremely easy, but the tutorial showed a book that proved to be quite tenacious. After that, you’re done! I added a few magnets because, hey, why not? And then some book pages to give it some character. All in all it took 15 minutes and wasn’t difficult at all!
Accessorizing!
I chose to layer book pages in the background, so that it looked like the entire book was still there and because I wasn’t a fan of the picture right up against that pattern. I also added magnets so that I could hang this against my refrigerator and surprise my roommate when she got home. To hang, though, I’ll probably also glue some picture hangers. Pretty easy!
-

- Tools of the trade.
-

- Aren’t they lovely patterns? Say goodbye.
-

- Separate cover from text. I didn’t destroy any pages this time!
-
- I love the look.
-
- My original 4×6 frame.
-
- Then, I realized I might want to have some wiggle room.
-
- Cutting the cardboard away first.
-
- Then, the cover came away very easily.
-

- Two holes cut away! Sans pictures.
-
- I added magnets, because our refrigerator could use some flair.
-
- Folded. Maybe it could still pass for a book?
-

- The final look. I got artsy with my pics.
-

- What a snazzy fridge door.
The Tree that Started it All
February 4, 2012
“All the world’s a stage,
And all the men and women merely players;
They have their exits and their entrances,
And one man in his time plays many parts.”
Shakespeare’s As You Like It holds one of his most memorable quotes, and certainly one of my favorites. I even used this quote for a typography project for class (the before and afters of kerning, see below). Today, however, I’ve decided that As You Like It, though a fantastic play, would look better as a tree. Let me explain.
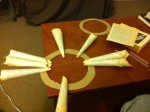
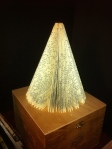
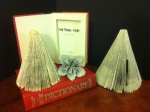
When I returned home for break this past Christmas, sitting on the mantle was an adorable book page tree, like the ones you see here. My mother had seen the post at this fabulous website here (and it has excellent instructions).Thrilled, I asked the how’s/why’s/what’s. This project, this folded book, spurred the idea of this senior thesis project. So, thanks Mom, for doing one little craft that would lead me to do 40 more.
The book on the left is actually a National Geographic, so that you can see what a book with colors looks like. The one in the middle is my Shakespearean masterpiece, and the one on the right is Isla de Luz, a Spanish book that I had to read during Intermediate Spanish II that I’ll probably never read again.

Why make one when you can make three?
Folded Book Page Tree
- Materials needed: A Book. And, thankfully, in this case that’s all unless you want to accessorize.
- Time it took: I’d say 20min per 100 pages. So, all these books took me about 1hr30mins.
- Things I learned the hard way: Don’t get lazy and start half-folding your pages. If they’re not creased crisply, then the thicker books will start to get their pages bundled up in the middle.
How did I do it?
I’ve decided to show, not tell. Illustration time!

Folding Pages 101
Accessorizing!
If you’re not a fan of how the books look alone, then why not try adding a few accessories to spice things up? I added a star to the national geographic, glitter to the Spanish book, and a snowflake ornament to Shakespeare. I’m sure there are several ways to truly style these to make them stand out from all your decor.


![]()


Hollowed Books
February 1, 2012
“Mystery bores me. It chores me. I know what happens and so do you. It’s the machinations that wheel us there that aggravate, perplex, interest, and astound me.”
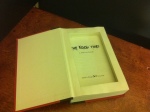
The quote above is from “The Book Thief,” one of my favorite books and the first to be, well, let’s say ‘altered.’ Though this particular book will be missed (and I will forever endure the wrath of my sister, who was not happy to hear about its destruction), the other book is not going to cause anyone to get angry with me. The dictionary, though once a useful tool, has since lost its glory due to the onset of technology. I borrowed this dictionary from the writing center on campus with the permission of the writing center coordinator. I promised it’d be returned a lot cooler than when it first started.

Success!
Hollowed Out Book
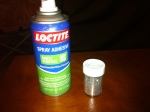
- Materials needed: Box cutter/utility knife (good luck with an x-acto knife if you’re going to try it), glue mixture (70% elmer’s glue and 30% water), a small paintbrush, a ruler, a pen, and a book!
- Time it took: 1hr for The Book Thief, 2hrs for the dictionary.
- Things I learned the hard way: This is messy and frustrating. I’m not sure how anyone gets a clean cut through all their pages, unless they just happened to cut each page individually. Also, they’re not joking about the 70/30 glue to water ratio. You were warned. The last thing: the pages won’t stick unless you actually stack something heavy on top of the book as it’s drying.
How did I do it?
I followed the instructions of this fantastic lady here. I also watched a youtube video here to make sure I was doing everything correctly.
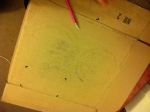
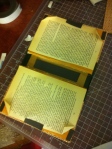
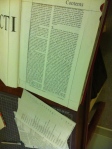
The run down: find a good, sturdy book, one that is at least 200 pages, I’d say. Open the front cover and skip past the first three pages (you’ll need them later). Use your pen and ruler and measure how far from the edge you’d like your hole to be. Make the marks. Then, mix up your glue and water. 70% glue and 30% water, or the glue won’t be strong enough. Shut the book, get your paintbrush, and proceed to ‘paint’ the glue on the sides of the book. Close the cover leave the cover and three pages open, and stack several heavier books on top (I suggest the entire Harry Potter series. Book five really helped me out here.) Wait about 20-30 minutes. Then, return and check your pages. Ta-da! Now, the fun part. Take a deep breath, look at your marks, look at your utility knife, and then go for it. As you’re cutting, really watch out for the corners. Don’t just rip the pages out; take care to secure that each page has been sufficiently cut out. I stopped the book thief about a third of the way through, and I stopped the dictionary at the S’s.
However. I totally messed up the pages of the dictionary, as you can see below. In a panic at two hours of my time wasted, I decided to get artsy with it. I cut up a few of the pages that had been taken out of the dictionary and collaged them on top so that you couldn’t see the horror of the poor craftsmanship. Done!
-
- I didn’t know at the time what hardship my poor xacto knives were about to face.
-

- Goodbye. I’m not a fan of the typography anyway.
-

- 70/30! Glue mixture.
-

- DreamWeaver CS5, The Book Thief, and Harry Potter were all there for me in this time of need.
-
- No going back now.
-

- At this point I realized how futile my x-acto knife truly was.
-

- The resulting cut out pages.
-

- Ack! Horrible!
-

- This will not do. New plan drafted.
-

- I made the decision to collage the pages. Oops!
-
- Much prettier! Second try with a second book, to redeem myself from the first.
-

- Success!
-
- All Projects to Date, see the other two in the other posts
-

- Another shot
-

- I have a very patient roommate. She doesn’t mind the mess, thankfully.
-

- Had to lift half the book to get underneath.
